Re-Packing Wheel Bearings
This blog article is primarily for me to remember the procedure (and part numbers needed) to re-pack the bearings on our 2018 Luxe LF-39FB with dual 9000 pound axles and Morryde independent suspension. The generally accepted maintenance schedule for wheel bearings is to inspect and repack them every 12,000 miles or 12 months whichever comes first. Although there are products to add grease to bearings without taking the hubs apart, it’s still a good idea to do so to enable inspection of the bearings and other parts to prevent a possibly catastrophic failure that might otherwise be preventable. For instance, we found a leaking brake caliper and a bad brake pad during this procedure. Luckily, we didn’t find any bearing issues. Although you could easily do the job in half or less time, we did the work on one hub at a time so that parts could not become mixed up between hubs. This process took us about 2 hours per hub working at a slow pace.
Our rig includes RCMHS-13-10H-HD Kodiak hubs and disk brake assemblies for an industry standard #99 spindle. The major parts that make up each of the 4 assemblies include the following parts:
HUB/SPACER-99-SW – 10,000 pound hub/spacer for #99 spindle
ROTOR-13-10 – 13″ Kodiak rotor
DBC-338-HD-E – Loaded E-coated caliper for 10K rotor; ceramic pads; nickel chrome piston; with mounting clips. The brake pads by themselves are DBC-2250-CERM-PAD (1 set per axle)
CMB-13-10QHD-E – E-coated caliper mounting bracket for 5 bolt 10K brake flange, 13″ rotor.
Each complete hub consists of the following parts:
Q-10-14K-PCAP – Polycarbonate dust cap. The O-rings on these caps are not available separately from Kodiak. However, I was able to buy #239 Viton, 75A Durometer, round, brown O-rings from Amazon. They are 3-5/8″ ID, 3-7/8″ OD, 1/8″ width.
Q-10K-RUBBER PLUG – Dust cap plug
28580 – Inner bearing
28521 – Inner bearing race (Cup) (Note: The Kodiak expanded view shows 28520 but this is wrong for my axles based on measurement and the actual part number on the part. 28521 is correct.)
25580 – Outer bearing
25520 – Outer bearing race (Cup)
568303 – Seal (Cross Reference: Chicago Rawhide CR27438, Hayes 091030, National B370352BG, Transcom OB27377) Our original parts were 27438.
Cotter pin – ¼” X 3” to 4-1/2” (The original cotter pins were 4” long, 3” works fine)
DBC-HD-CLIP – Caliper retaining clip*
DBC-HD-FLBOLT – Caliper retaining bolt*
DBC-2250-CERM-PAD (also called DBC-2250-CRM-PAD) – Brake pads (1 set per axle)
* Caliper clips and bolts should probably be replaced when replacing the brake pads. Part DBC-HD-CLIP-REPL contains two retaining clips and two bolts.
Supplies needed to get started:
“Bag of Rags” (shop towels) – Package of 25
Lithium Grease – 30 Oz. Use NLGI GC-LB Grade #2 product with a minimum dropping point of 440F with EP, corrosion and oxidation inhibitors. I use Lucas Red-N-Tacky grease.
Permatex® Silicone Ceramic Extreme Brake Parts Lubricant or Permatex® Ceramic Extreme Brake Parts Lubricant – High temperature brake lubricant. One tube should last for many repacks.
CRC Brake Cleaner – 1 can
Spray Metal Parts Cleaner – 4-5 cans (1 for each hub)
Liquid metal parts cleaner – 32 Oz. – You can use Kerosene, Mineral Spirits, or in a pinch Gasoline (DANGEROUS).
Permatex Blue or Loctite Blue 242 thread locker – 1 tube NOTE 9/17/2021: Using thread locker on the caliper clip bolts is critical when re-using existing bolts. New bolts should already have thread locker on them. Without it, the bolts are known to back out causing the caliper to dislodge from the bracket resulting in loss of brakes and damage to the wheel. A DRV recall specified the use of red thread locker instead of blue. The issue there is that the bolts must be heated to over 500 degrees in order to remove them for future maintenance. Red is designed for parts that do not need to be removed normally for maintenance where blue is designed for removal and maintenance. Red would provide additional strength. Use blue at your own risk!
Paper Towels – several rolls
Large boxes (broken down) – To put under work areas.
Large Nitrile Gloves – Lots of them, we went through a box of 100.
Cotter Pins – 4 (one for each hub), 1/4″ X 3 to 4-1/2″
Seals – 4 (see above) Seals MUST be replaced whenever the hub is removed. They are almost always destroyed when the hub is removed but even if they aren’t, they might not seal correctly which could cause other more expensive problems.
Procedure
Remove one wheel


- Be sure the other wheels are securely chocked.
- Lift the side of the trailer to be worked on with the leveling jacks so that the tire is about 1/4″ off the ground.
- Put a jack stand under the frame or axle being worked on.
- Remove the wheel. DO NOT LET THE WHEEL COME DOWN ON OR REST ON THE POLYCARBONATE DUST CAP AS IT IS FRAGILE.
Remove the brake caliper


- Using a 9/16″ socket, remove the two bolts that hold the caliper in place.
- Remove the two metal clips.
- Lift the caliper off the mounting bracket. Note that it might stick and you may need to carefully pry it up or even use a bit of penetrating oil.
- Inspect the caliper for leaks and/or damage.
- Inspect the rotor for damage.
- Inspect the brake pads. From the 12,000 mile wear it looks like pads should make it to 24,000 miles and possibly 36,000 miles. Update 2/15/2022: Replaced brake pads at 24932 miles. The caliper clips and bolts should probably be replaced when replacing the brake pads.
Note: The picture shows the dust cap already removed but it should not be removed until the next step.
Remove the hub


- Using an 8 point 3-1/2″ socket (Or large slip joint pliers if you must) to remove the dust cap from the hub.
- Using needle nose pliers, remove the old cotter pin and discard it. You may have to cut the pin or bend it back and forth until one leg breaks to remove it.
- Using a 6 point 2-1/4″ socket (Or slip joint pliers) remove the castle nut holding on the hub.
- Remove the spindle washers. Kodiak shows only 1 in their exploded view but ours has 2.
- Remove the outer bearing cone by pulling on the brake rotor. You will likely need to apply a rocking motion on the rotor.
- Pull the hub assembly toward you being careful not to damage the outer bearing race or the spindle threads. It’s likely that the seal will prevent pulling off the hub without carefully putting something behind the rotor to pry outward on the hub. I used the handles of my large slip joint pliers to do that as they are soft and protect the rotor.
Disassembling and cleaning the parts


- Using a suitable seal puller (I used our hub cap tool) remove the seal. With the hub cap tool I inserted the tip as far as I could and was able to get the seal about half way out by working my way around the seal. When half way out, I could angle the tool slightly to get the seal out the rest of the way. Discard the seal.
- With the seal removed, the inner bearing can be removed. Clean the inner and outer bearings with a clean lint free rag then soak them in metal parts cleaner, Kerosene or Mineral Spirits. Gasoline can be used if you must but that is dangerous! Swish them around every so often to help loosen the old grease.
- Thoroughly clean the bearing races and hub with clean lint free rags and metal parts cleaner.
- Clean the spindle washers, dust cap, dust cap plug, dust cap O-ring and castle nut. DO NOT USE brake or part cleaners on the polycarbonate dust cover, O-ring and dust cap plug as these will be damaged – just wipe clean. See the note at the top of the article about replacing the O-rings.
- After the bearings have soaked for 10 or 15 minutes, use spray metal parts cleaner to blow out any remaining traces of old grease. Allow to dry completely before continuing with the next steps.
- After cleaning and drying, inspect the bearings and races for pits, scoring and abnormal coloring. Replace the bearings and races as needed. Bearings and races must be replaced together at the same time.
Pack the bearings with grease


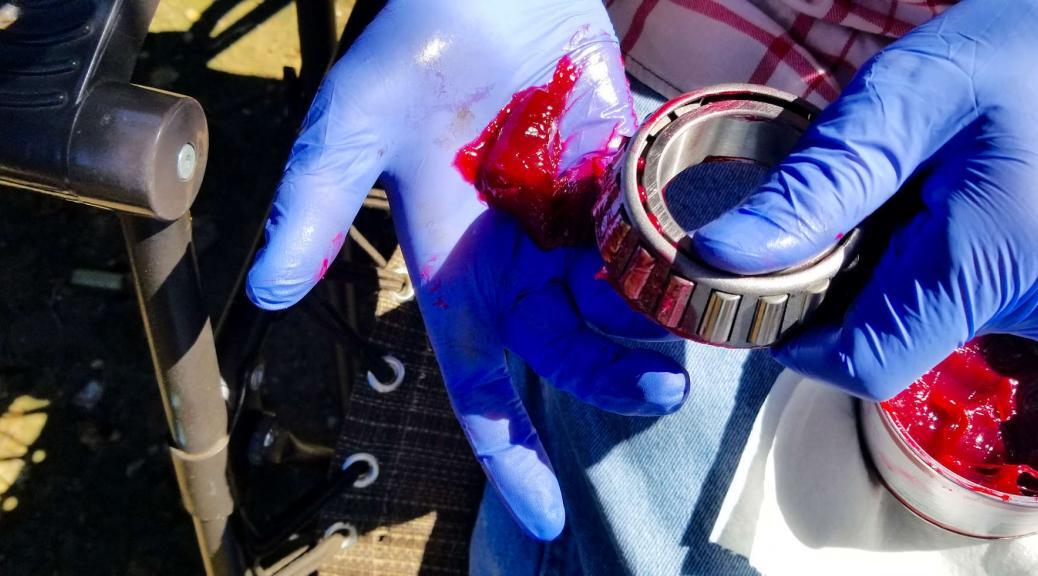
- Once the bearings have been cleaned and dried, it’s time to pack them with grease. Place some grease in your palm then force grease into the bearing from the wide side until it comes out from between the rollers on the narrow side.
- Once packed, coat the outside of the bearing cone with a thin layer of grease all the way around.
Prepare the hubs


- Insert the inner bearing into the race narrow side first.
- Spread a thin layer of grease on the outside surface of the seal.
- Place the seal onto the hub (wide side first) then using a rubber mallet slowly hammer the seal all the way in by applying pressure with a finger opposite to where you are hammering and working your way around the seal. Ensure the seal is fully seated and is straight within the hub. NEVER use a metal hammer directly on the seal. A wood block can be placed over the seal when hammering it into place to protect it.
- Apply a small amount of grease to the rubber part of the seal to aid in installation of the hub.
- Flip the hub over, placing it on a clean paper towel, then apply a thin layer of grease to the outer bearing race and hub.
Reinstall the hub


- Clean the spindle of any grease and inspect for wear. When cleaning the spindle, first remove any remaining parts of the old seal.
- Coat the entire spindle with a thin layer of grease.
- Insert the hub onto the spindle with the outer bearing removed. If you install it first, the spindle will just push it out and it will fall on the ground likely getting it dirty and forcing you to re-clean and re-pack it. Push on the hub to get the seal to seat on the spindle. Don’t worry if you can’t get it to fully seat, we’ll fix that later. Be careful not to damage the seal against the spindle.
- Holding the hub up, insert the outer bearing with your fingers and keep a finger on the bearing to keep it in place.
- If the hub did not go in and completely seat the seal (you can tell this because not many of the spindle threads will be exposed) then put on the castle nut (without the spindle washers if necessary) and tighten it down enough to get the seal to seat, then remove the castle nut.
- Put the lightly greased spindle washers on the spindle and then reinstall the castle nut finger tight.
- While spinning the hub, tighten the castle nut to 100 ft.-lbs. of torque, back off the nut one full turn, re-tighten the castle nut to 50 ft.-lbs. of torque to pre-load the bearings.
- Back off (never tighten) the castle nut about 1/6 to 1/4 turn until the cotter pin can be inserted. The hub should turn freely and if you grab the rotor on two sides and apply a rocking motion you should not hear noise or feel any detectable motion. This would be the time to check the run-out with a dial gauge but I don’t have one.
- Bend one leg flush over the end of the spindle and the other leg flush against the spindle nut. With a hammer lightly tap the ends to make them as flush as possible so they do not contact the dust cap or dust cap plug.
- Apply a small amount of grease around the castle nut and spindle washer area.
- Apply a small amount of oil or brake fluid on the O-ring, cap and hub where the O-ring contacts it to lubricate the O-ring. Install the dust cap ensuring the O-ring is properly in place and torque to 20-30 ft.-lbs. Be sure the cotter pin does not interfere with the rubber plug on the dust cap or it may cause it to leak. The plug should be flat against the dust cap.
Install the caliper


- This step probably isn’t needed unless replacing the pads: Using only a 5/16″ 6-point wrench or deep socket loosen the brake bleeder screw. Put 1/4″ tubing over the bleeder and route the other end of the tube into a suitable container to catch the brake fluid. Open the screw as you use a large C clamp to compress the disk brake piston. Close the bleed screw hand tight then use a 5/16″ 6-point wrench or deep socket to tighten slightly (maybe 1/8 turn). DO NOT OVER TIGHTEN! Discard the old brake fluid.
- With a wire brush, clean the caliper and mounting bracket where the two contact.
- You probably need to use a C-clamp and compress the caliper piston slightly. Be sure to put a rag around the brake fluid filler cap to collect any fluid that leaks out.
- Apply a small amount of high temperature brake grease to the contact point of the caliper and the caliper mounting bracket.
- Insert the rear brake pad on the caliper mounting bracket and insert the front brake pad in the caliper. Place the caliper back on the caliper mounting bracket being careful not to twist or kink the brake line.
- Clean the caliper retaining clips (or replace them) then apply a small amount of high temperature brake grease to the clips where they touch the caliper.
- Unless replacing the caliper retaining bolts, apply blue thread locker to them then install the bolts through the retaining clips to hold the caliper in place. New bolts should already have thread locker on them. Torque each bolt to 45 ft. lbs. Be sure the clips are installed in the correct direction. NOTE 9/17/2021: Using thread locker on the caliper clip bolts is critical. Without it, the bolts are known to back out causing the caliper to dislodge from the bracket resulting in loss of brakes and damage to the wheel. A DRV recall specified the use of red thread locker instead of blue. The issue there is that the bolts must be heated to over 500 degrees in order to remove them for future maintenance. Red is designed for parts that do not need to be removed normally for maintenance where blue is designed for removal and maintenance. Red would provide additional strength. Use blue at your own risk!
- Reinstall the wheel and torque the lug nuts to 150 ft.-lbs. DO NOT LET THE WHEEL COME DOWN ON OR REST ON THE POLYCARBONATE DUST CAP AS IT IS FRAGILE.
- Using a rubber mallet reinstall the hub cap. DO NOT HAMMER IN THE CENTER OF THE CAP, JUST THE OUTSIDE EDGE.
Repeat for the remaining hubs. When all done apply the brakes several times checking the brake fluid level. Add fluid as needed.
The following file is an exploded view of the parts that make up the RCMHS-13-10H-HD Kodiak hub. Again note that the exploded view shows the Inner bearing race (Cup) to be 28520 but it should be 28521 instead.
2 thoughts on “Re-Packing Wheel Bearings”
Excellent Wish I had found it before doing this repack and spending days looking for the part numbers 🙂